E-commerce visuals often define purchasing decisions. Statistics show that 75% of shoppers rely on product images when browsing an online store. Research by eBay shows that photos drive up to 65% more conversions.
It goes without saying that you need to support your product pages with quality images. But there are still many questions surrounding image optimization. How many should you use? What sizes are the best? Can photos drain your loading speed? How to make pictures searchable in Google? How to improve SEO on a Shopify store thanks to images? And so on.
In this post, we’ll be finding answers to the most common questions related to Shopify image optimization.
First of all, Shopify does a lot of heavy lifting for you:
- It uses a CDN so that image files are copied and distributed among servers located across the world, and each store visitor sees a picture rendered from the server that’s closest to them.
- It makes images responsive, which means that several dimensions are indicated in the code, and each user sees a picture resized to the capabilities of their device’s screen.
- It automatically applies compression, saving resources for faster page loading.
All of these measures are great, but there are still some ways to optimize your Shopify store images. Here are the 8 things you should consider for making your store’s pictures attractive to both customers and search engines.
1. Rely on Shopify image compression or use other tools when it’s not enough
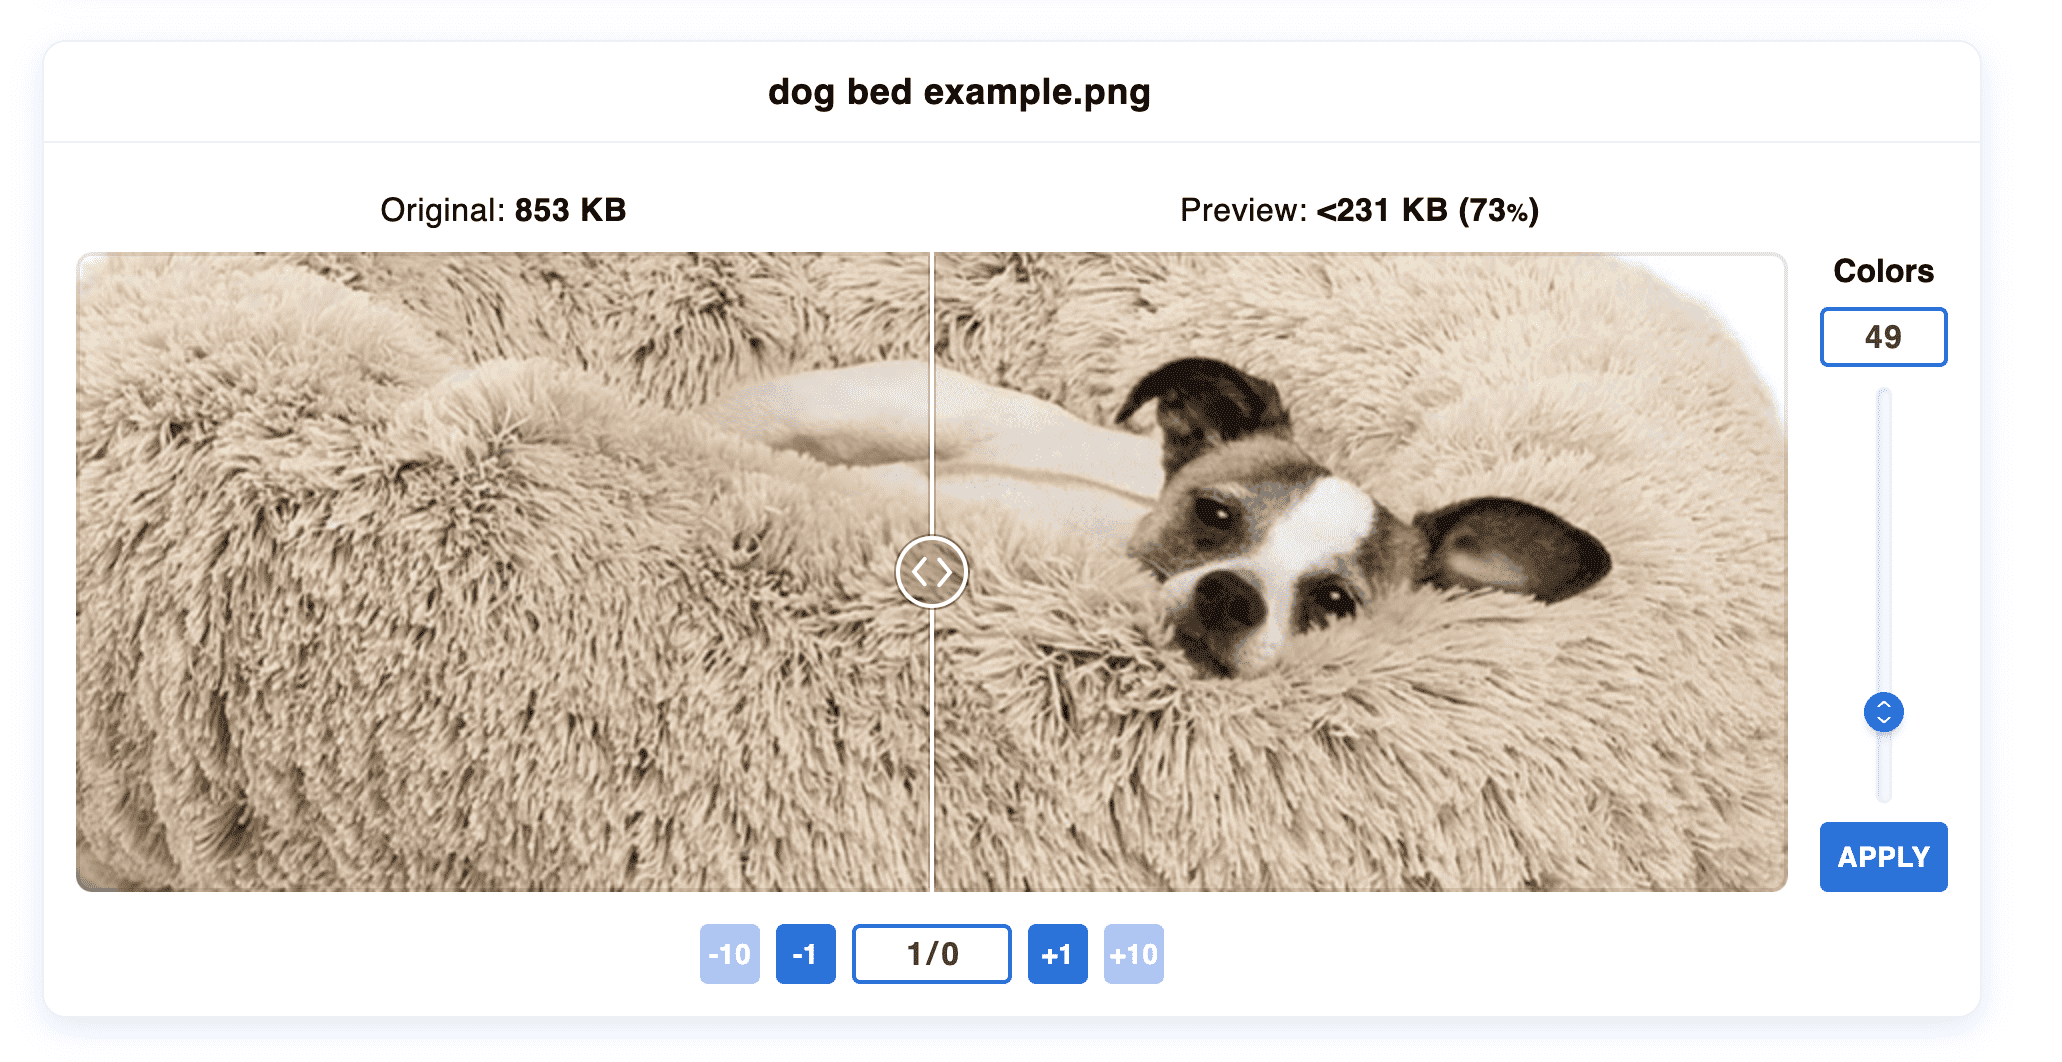
Images are the biggest contributors to slowing down loading speed, while speed is crucial for user experience and SEO. To ensure fast page loading, use compression tools to find the right balance between the quality of the picture and its size.
Note that it’s better to use PNG or WebP formats as they are capable of lossless compression, compared to JPEG which loses more in quality when getting reduced in size.
There’s native Shopify image compression, which means that after you upload a file to your page, Shopify will automatically compress it. That’s why Shopify recommends always uploading the best quality you have.
However, Shopify doesn’t always do the best job, leaving no choice to you of how much compression you want to achieve. Sometimes, photos look too blurry, and sometimes, on the contrary, automated compression is not enough. Merchants looking to avoid automated compression have come up with a solution to edit the code and change image ratios to “master.”
If you’re not happy with how Shopify displays uploaded pictures, you can use this trick. But don’t forget to compress your visuals manually. There are plenty of tools for this (including Shopify image optimization apps), and some allow you to adjust the level of compression and compare the result with the original image.
Decorative images that are not related to products can also be heavy and slow down page loading. Make sure to minimize their sizes as well. Sometimes, it’s better to go with custom CSS instead of pictures that serve as colored styling elements.
2. Use descriptive file names and alt text
Names of files you upload to Shopify are crawled by search engines just like the text on your pages. You might have your product photos named by default by a camera (like IMG_421.jpg)—you’ll need to modify these generic names. The best choice is to combine a product name and its brand and/or model: for instance, Smoothie-Blender-Blendjet-2.
The way you name product images should correlate with what you write in product pages’ titles and headings. The goal is to accurately describe what’s presented on the page, as well as on each individual image. Analyze what search terms people use for the types of products you sell and incorporate those terms into file names. But don’t overuse keywords—write a readable and simple phrase.
How will this help you? Descriptive, keyword-rich file names will help you rank higher both in regular search and in Google Images.
Note that you can’t change file names once you upload them. To edit Shopify image file names, you have to reupload them.
What’s more important to SEO is what you specify in the alt text. Alt is an attribute of the img tag that is meant for accessibility: when a browser can’t or fails to render an image, users will see the alt text. It also serves as an explanation for visually impaired users.
It’s important to fill out alt text for each product image. Follow the same rules as with file names: indicate what product type and model is on the picture, but don’t just copy what you already have in the page title, image name or elsewhere. Google analysts recommend describing what’s on the image instead of repeating the product name. Also, avoid using commercial keywords (“buy patio umbrella”).
Shopify makes it easy to use alt text. In the admin panel, open an image in the Media section on your product, and you’ll see the alt field on the right.

How will this help you? Helpful alt text will facilitate your image rankings and make your pages more accessible.
3. Make sure your Shopify images are responsive
As we’ve mentioned, Shopify uses responsive images that adapt to each user’s screen. But it can be that some third-party themes don’t automatically support responsive visuals. If you’re considering changing your Shopify theme, pay attention to this when choosing one.
In any case, you can always specify several dimensions manually. For this, you need to edit your theme code and fill out the srcset attribute in the img tag. It can look like this:
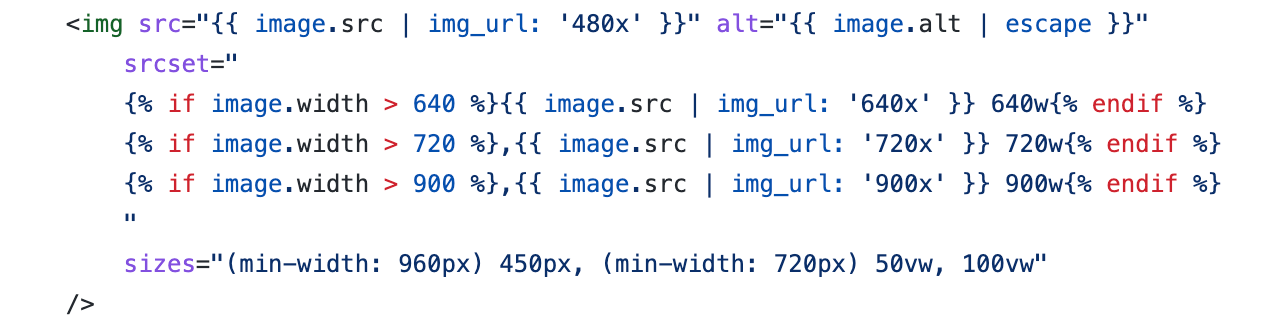
4. Show multiple product photos and be consistent
Your goal with product photos on Shopify is to attract more customers. Don’t limit yourself to one image per product—include a variety of pictures that show items from different angles and in practical settings. This way, you’ll increase trust in what you’re selling and make visitors better informed about your products’ qualities.
A study of eBay listings showed that having two product images doubled conversion rates compared to having just one. But how many do you need above those who? There’s no universal answer to how many product images you should have per page. You can run a/b tests to see what converts best: more images to showcase product features or fewer images to make the store faster. You can also use heatmaps to see what types of product photos visitors interact with.
The same applies to collection pages: experiment with how many products are displayed on them. Note that Shopify sets the maximum limit to 50.
When you do use multiple images per product, make sure that the thumbnails shown on collections pages are consistent. For instance, it won’t look good if some of the products are shown in the front view and others in the back view. Plus, it looks cleaner when all presented products are photographed in the same style. Also, if you’re using videos or 3D models, you can create thumbnails for them with a high-quality image—otherwise, Shopify will automatically generate those thumbnails.
5. Add zoomable images
Research shows that the ability to zoom in on high-quality pictures leads to 3x conversion rates (along with the ability to see multiple views and colors of a product). There are several ways to make Shopify photos zoomable.
If you have developers on your team or can hire specialists, they can quickly add zooming functionality using JavaScript, in particular JS library JQuery or JS framework Vanilla.
You can also choose a Shopify image zoom app. For example:
- Full Page Zoom will add zoom-in and zoom-out icons to your images, allowing users to enjoy a full-screen view of a product. It costs $2.99 per month and includes a 30-day free trial.
- Magic Zoom Plus will allow for zoom preview on hover and full view on click. The lifetime license costs $69, but the app can also charge a monthly fee for additional features, such as 360 product spin.
6. Create an image sitemap
A sitemap is a list of all store’s pages that you want to appear in search results. As we’ve discussed in our article about Shopify sitemaps, Shopify automates the process of creating and formatting, and the only thing left for you to do is submit a sitemap to search engines. However, you don’t have much flexibility with a Shopify-generated file, and it doesn’t include images.
It makes sense to make a separate image sitemap. This is another way to help search engines discover your product photos and rank them well. To create such a file, you can use an app like Image Sitemap.
7. Implement lazy loading
If you have a lot of images on a Shopify store, you might want to load them asynchronously. The lazy loading technique doesn’t load everything you have on a page right away but does it gradually, showing pieces of content when a user scrolls down to them. It’s a great loading speed saver and an SEO booster, especially given that the 2021 Core Web Vitals update assesses not how fast the whole page loads but how fast the first render is ready (which means above-the-fold content).
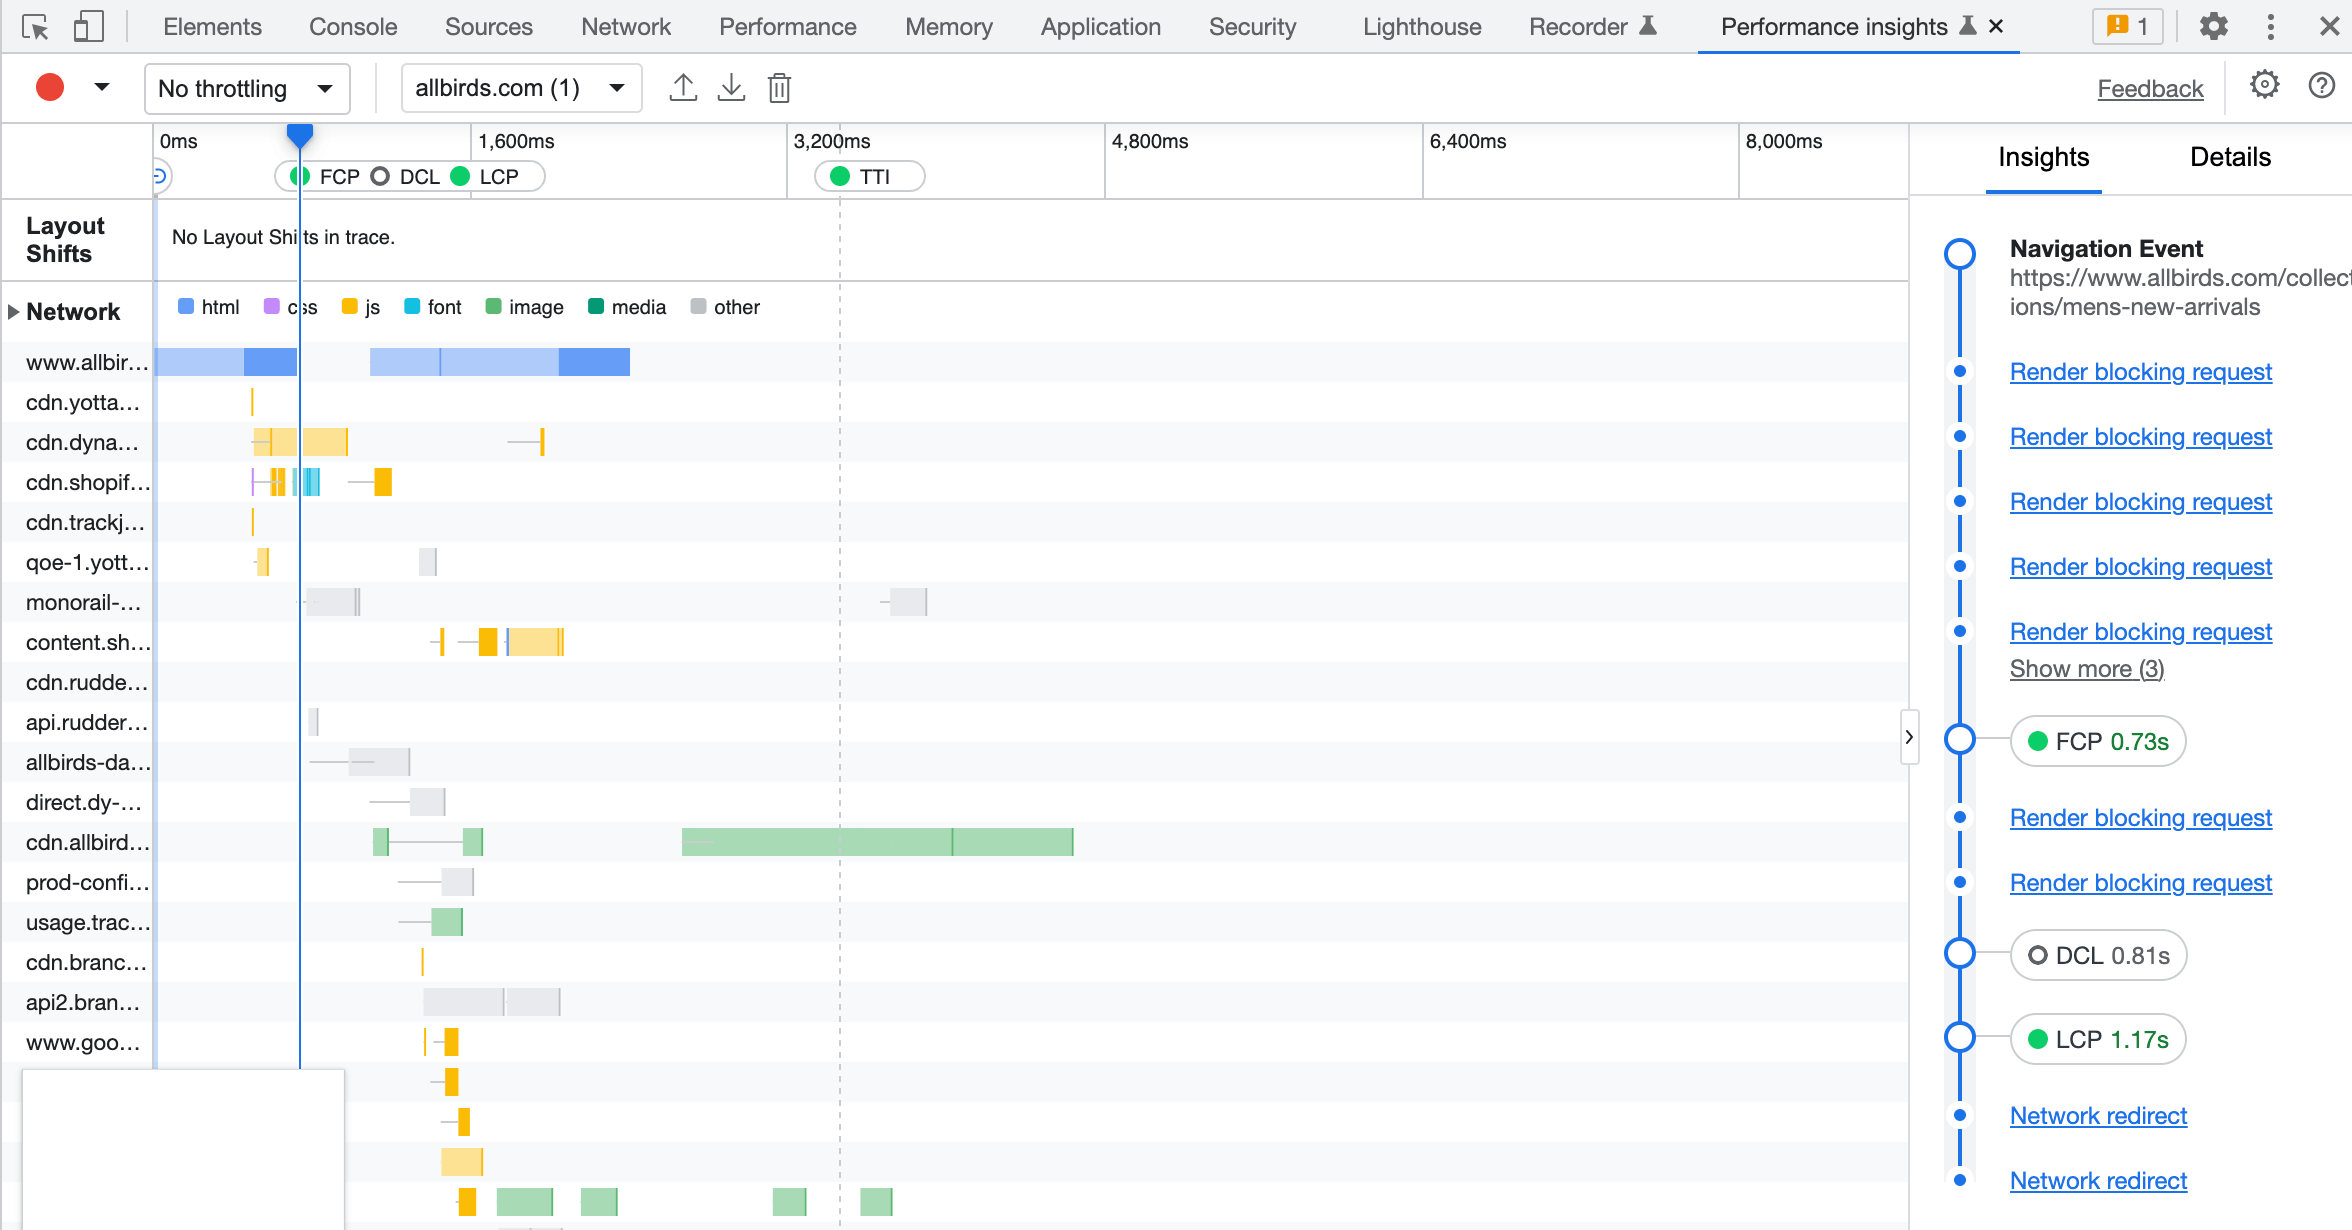
You can run a check using Performance Insights in Chrome Dev Tools: it will visualize what might be blocking page rendering and how much time it takes to load the LCP (largest contentful paint, which is crucial for search engines) and for the page to become interactive (see TTI, time to interactive).
To apply lazy loading, you need to insert loading: 'lazy' to the img tag. You can automate it with the help of image optimization apps for Shopify like TinyIMG (includes many SEO features, and asset preloading is available in any paid plan) or Loadify (lazy loading is offered at $3.99 per month).
8. Consider virtual photography
As technology progresses, the demand for innovative, interactive shopping experiences rises. You can not just include different photographs and videos to show products from different angles and in practical use—you also can implement virtual photography.
What does it mean? There are software solutions that will create or modify images based on digital designs—without actually photographing a physical product. Plus, they can make your products three-dimensional so that customers can observe them from different angles and have a more immersive experience.
It can be especially helpful if your store offers customization options by demand: for example, you sell sofas that might come in different colors and modified shapes. You don’t have all the possible types of sofas ready to be photographed, as you produce them for each individual order, but you can still show various shape and color options with the help of virtual photography software. Check out solutions like Threekit to get a grasp of how it might work for your store.
Optimize Shopify images at ease
By following these recommendations, you’ll make your pages more conversion-generating, improve loading speed, and rank higher on regular and image search. You go with manual image optimization for your Shopify store or decide to outsource, but the right tools and SEO apps can save you a lot of time and bring your store to its image-perfect existence faster.
If you’re looking for more Shopify SEO tips, check out our optimization guide.