Checkout is definitely the most crucial part of the purchase funnel. A customer has already decided to purchase, and the role of the checkout is to collect shipping information, process the payment, and create the order. That's why it should be as straightforward as possible. This guide will help you optimize your Shopify checkout to drive more conversions and overall sales.
The quite common belief among Shopify merchants is that you can't customize the checkout page (process) unless you are on the Shopify Plus plan. However, that's not true, and there are many things you can customize and optimize even if you are on the Shopify Basic plan. On the Shopify Editions Winter 2023, Shopify announced the possibility of the one-page checkout which is super exciting!
Update [March 2024]: The one-page checkout is live and we put together one-page checkout optimization guide focused solely on the new (reduced) layout.
We bring you the ultimate guide summarizing the best practices and tips on how to customize your Shopify checkout to perform better—increase conversions and average order value.

By default, Shopify uses your store name and displays it as a text above the breadcrumbs navigation in the checkout. However, you can upload a custom logo and have it displayed instead. Using your business logo builds trust and makes the checkout more integrated into your storefront.
To upload a custom logo into your checkout, follow these steps:
- Go to your store admin > Online Store > Themes, and click on Customize your live theme
- In the left-bottom corner, click on Theme settings and select CHECKOUT
- Find Logo section and click on Select image, upload your logo and confirm by clicking on Select
- Review the visual appearance (make sure to check both desktop and mobile view) and click on Save if you are happy
The tricky part of your logo is the dimensions. Shopify doesn't provide any recommendations, but we recommend using a small logo size with a height of precisely 40 pixels and placing it to the left. The logo will use the same height for mobile and desktop devices and won't be resized to keep the original quality. Please note these dimensions are optimal for Dawn 2.0 theme.
The maximum height dimensions for other sizes are listed in the table below.
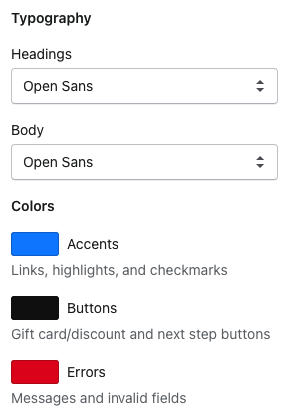
Another essential part of the checkout user experience is the design. Standardly, Shopify uses blue color for the buttons and System font. That's very likely different from the product or cart page styles, so the experience when going through the flow is not seamless.
Luckily, there is an easy way to fix it.
- Go to your store admin > Online Store > Themes, and click on Customize your live theme
- In the left-bottom corner, click on Theme settings and select CHECKOUT
- Scroll down to Typography and choose the font you are using on your storefront. If not available, keep the System one
- In the Colors section, change the button and link colors to match your product/cart page
If you use a dark storefront, you may also consider changing the checkout background color from white to dark. However, we don't recommend that, as lighter colors are usually better adopted when it comes to forms or checkout processes.
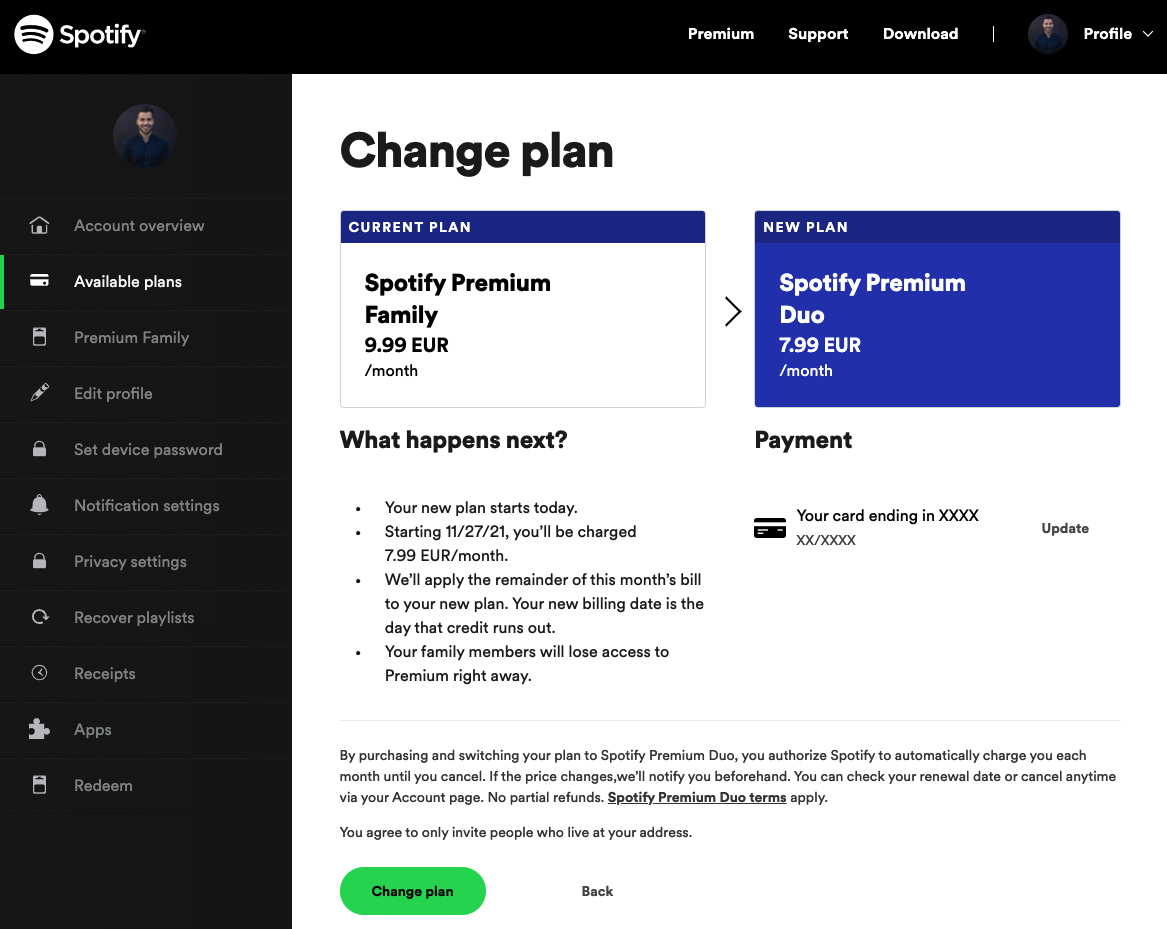
Take Spotify, for example, which is notorious for its dark UI (both in-app and website). But when it comes to changing your subscription (sort of a checkout process), it's white.
It's quite a common understanding that you can't change any texts in the Shopify Checkout unless you use Shopify Plus. Luckily, that's not true as you can change most of them very easily.
- Go to your store admin > Online Store > Themes, click on Actions for your live theme, and select Edit languages
- In the top navigation, choose Checkout & system, and there you go, you can edit all the texts you see, including buttons, links, footer, navigation, etc.
- Once done, click on Save and review your change on the live site
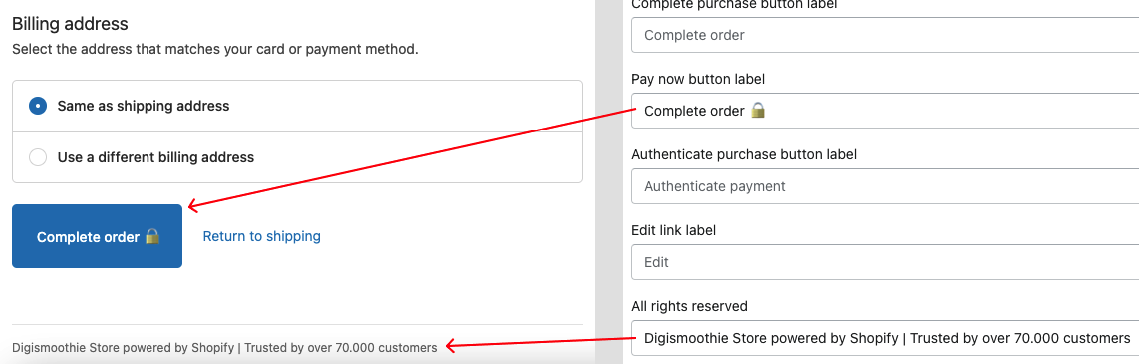
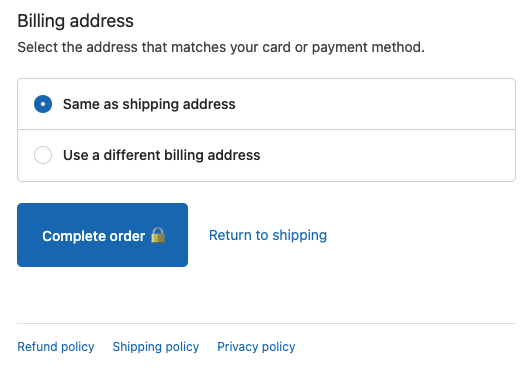
You can get very creative and change the wording to increase the trust (again) or motivate customers to continue all the way to the last step. In the example above, we have changed the default button from "Pay now", which is a bit aggressive, to "Complete order" and added lock emoji 🔒 to reinforce the feeling of security.
When it comes to the checkout page title, you can only change the last part, which is "Checkout" by default, and the middle part, which is your store name. But you can't change the format (i.e., current step - store name - checkout title).
This one is probably the most important tip of all. Review your current checkout fields and inputs (both optional and required) and think carefully about which you really need. The more you remove, the more you simplify the checkout process, and the higher the conversion rate will be.
According to Bolt, complex checkout is the 3rd most common reason why customers abandon the checkout. Especially nowadays, customers are more worried about their privacy and think twice before sharing their private information.
To remove some of the fields from your checkout, follow these steps.
- Go to your store admin > Settings > Checkout and scroll down to Form options
- Set Full name to Require last name only and all the other fields to Hidden
- Confirm by clicking the Save button
Don't also forget about your payment and shipping methods. It's good to offer a choice, but it shouldn't be too complex. If you have any shipping/payment methods that are rarely used, consider disabling them as well.
Another important reason why it makes sense to reduce the number of fields in the checkout (tip #4) is the overall page height. According to Statcounter, 30% (!) of customers are still using a desktop or laptop screen with a height of 768px or lower in December 2021.
The difference is clearly shown in the comparison image below.
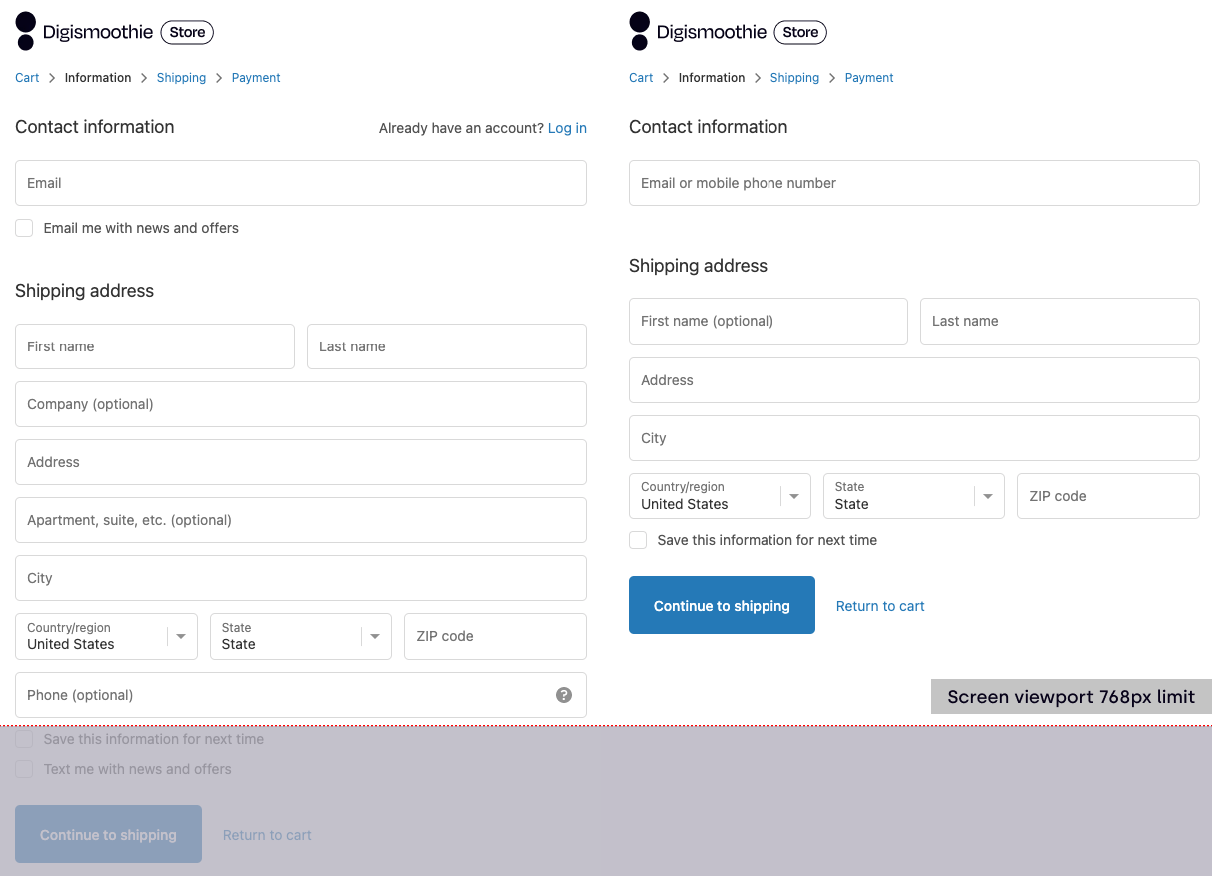
There are many elements influencing the height of the Information step: the number of fields, express checkout payments, size of the logo and background.
Displaying the Continue to shipping button on the information page (i.e., the first step of the checkout) above the fold is crucial. Once the customer proceeds further, the chances to finish the process increase dramatically. The shipping step is usually OK, and you can't do much with the payment step.
One of the most popular reasons for leaving the cart or checkout is lack of trust. According to Baymard Institue, 17% of customers are leaving the cart/checkout because they don't trust the store with their payment information.
Many free Shopify apps add trust badges on the storefront, including the cart page. But there isn't any to implement them into the checkout process.
However, there are a few workaround and tips to increase customers' trust during the checkout.
- Use your brand logo during the checkout (see tip #1)
- Customize the style and design of your checkout to match the storefront (see tip #2)
- Change texts in the checkout and focus on building trust (see tip #3)
- Add contact information (see tip #6)
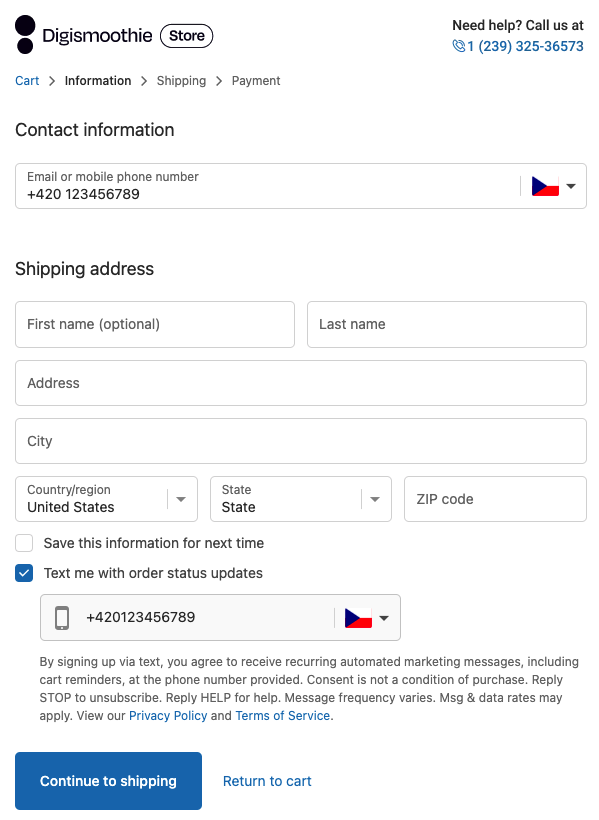
Displaying contact information during the checkout may help to increase the conversion rate. First of all, it builds trust because customers see a phone number they can call if they have any issue with the order. Second, some customers may run into problems, and they need help. Third, customers in some countries (Konnichi wa!) will call you just to make sure the store exists. 😉
A good practice is to add a small text saying, "Need help? Call us at X". You can edit via changing theme texts (see tip #3), but the more elegant way is adjusting your logo image (see tip #1) and adding another information. If you play with the fonts, colors, and text position, it will almost look like a native and unintrusive part of the checkout.

Even a better way than displaying contact information is embedding an online chat widget. You likely don't need it on the storefront, but we recommend having it in the checkout (and cart page). Those customers are ready to buy your products, so you should help them and guide them through the process.
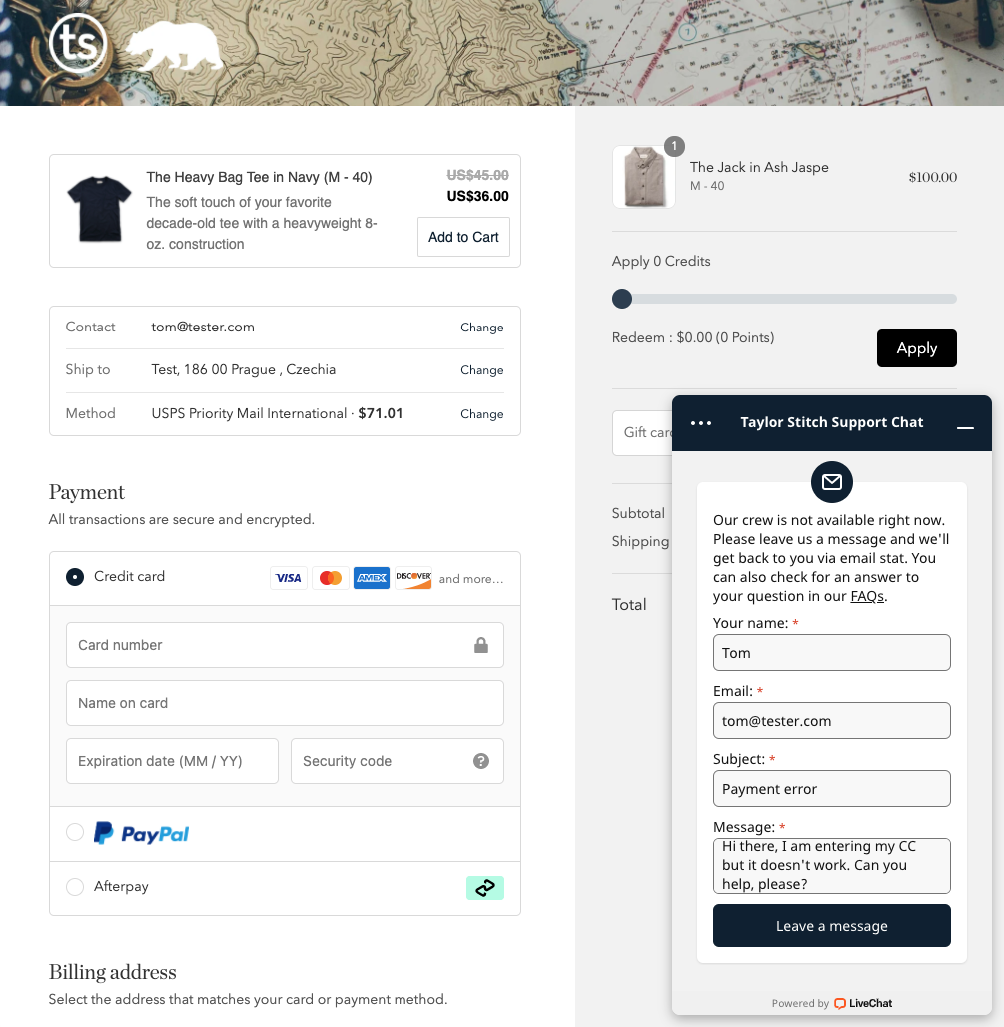
Unfortunately, that's possible only on Shopify Plus, as you need to add a custom javascript to your checkout page. Even Shopify Inbox chat doesn't work there.
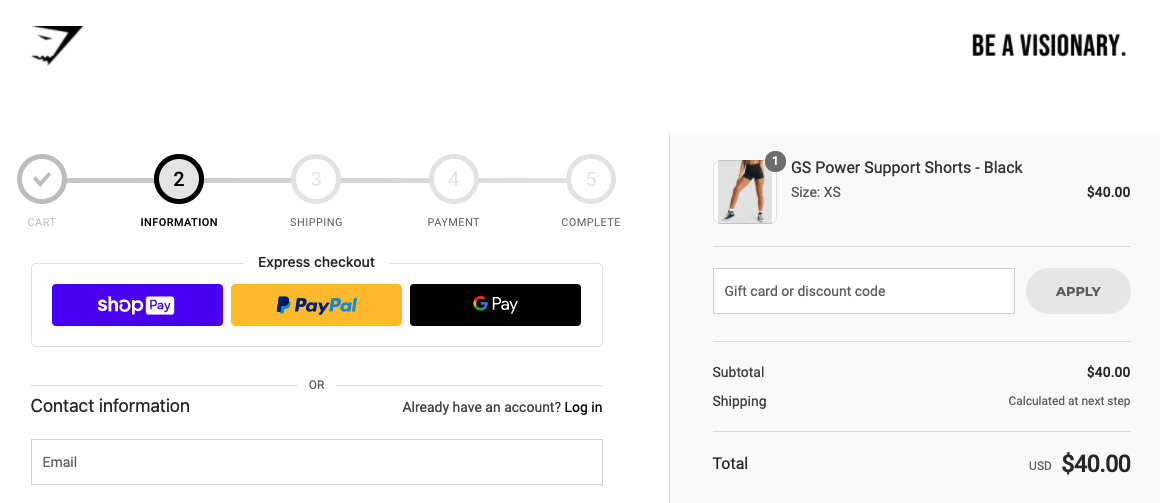
Express payments (sometimes also called accelerated checkout) allow your customers to skip the default checkout process and pay for the order using one of the support methods. The benefit is much less friction leading to higher conversion rates.
To enable express checkout in your Shopify store, you must be using Shopify Payments or Stripe.
- Go to your store admin > Settings > Payments
- Click on the Manage link for your card payment provider (typically Shopify Payments or Stripe)
- Add desired payment providers in the Wallets section and click on Save
The "payment buttons" can also be displayed on your product pages or your cart page. The payment methods supporting accelerated checkout are:
- Apple Pay
- Google Pay
- Amazon Pay
- PayPal
- Shop Pay
For example, with Shop Pay, the test has proven a massive 72% increase in the conversion rate compared to the regular checkout. Personally, I would love to see the detailed test results and compare the transaction amount done on Shop Pay and regular checkout. The point is that accelerated checkouts will always have a much higher conversion, but they aren't used by the majority of the shoppers (yet).
Another way to build more trust with your shoppers is by using your company logo as a favicon. That's the small icon visible in each tab of your browser. To upload your custom favicon, follow these steps.
- Go to your store admin > Online Store > Themes, and click on Customize your live theme
- In the left-bottom corner, click on Theme settings and select FAVICON
- Click on Select image and upload your own favicon
- Click on Save and review the change on the live site (it can't be previewed)

The favicon format can be JPG, PNG, GIF, or SVG format, and the optimal size is 32 x 32 pixels.
The favicon can be changed for all your pages (including the cart) except the Shopify checkout. Many merchants complain about that, but Shopify can't load a custom favicon in the checkout process due to security reasons unless you are on a Shopify Plus plan.
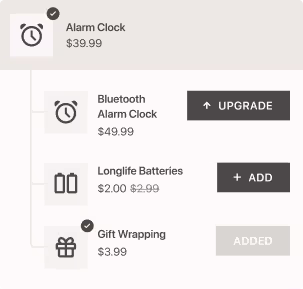
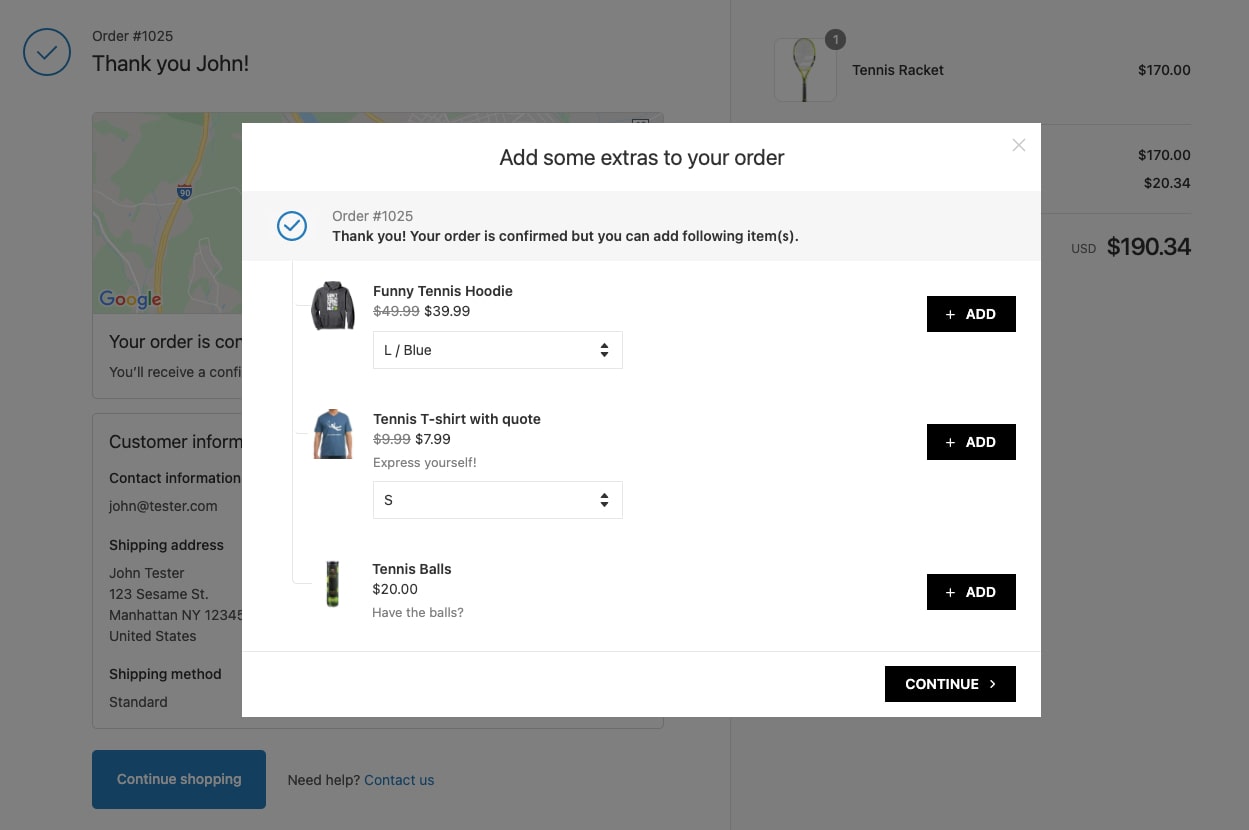
Upselling and cross-selling are proven methods of increasing average order value. It's pretty well established on the Shopify platform during the pre-checkout phase (i.e., before a customer enters the checkout process). However, with some of the latest Shopify updates like post-purchase checkout extension, you can now offer upsells and also cross-sells during the checkout process. The main benefit is that customer doesn't need to enter the payment information again, and the additional payment is captured via a single click (so-called one-click payment).
The only way to offer post-purchase upsells is via a third-party app. Here's our list of the recommended ones:
- Candy Rack – Alll-in-one upsell app covering the funnel from pre-purchase to post-purchase
- Checkout Promotions – More advanced app offering a lot of customization possibilities
- Zipify OCU – Popular upsell app offering lot of features including A/B testing
When it comes to the strategy of post-purchase offers, you should be a bit more aggressive and offer discounts. It's practically your last chance to upsell the customer.
Besides the pre-purchase and post-purchase upselling, you can also offer built-in native upsells through the shipping method. To learn how, see our article on free, no-app Shopify checkout upsells.
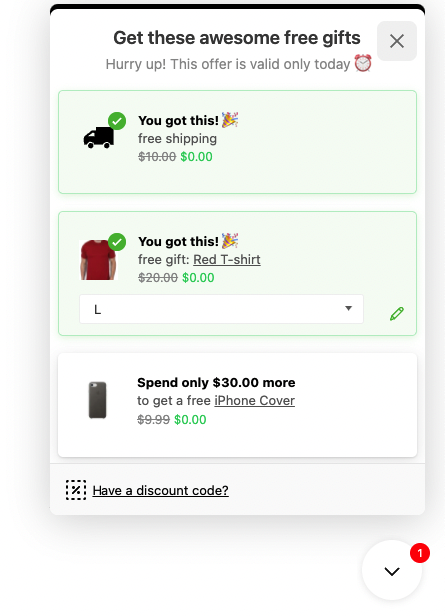
If you want your customers to finish the checkout, offer them some incentive. This tactic is proven to work primarily with incentives like free shipping or free gifts.
There are several ways how to offer a free gift product with the purchase, and we already described that in our article. The best way is using a dedicated app like Gift Box.
When it comes to free shipping, that's something you can set up directly in your Shopify store.
- Go to your store admin > Settings > Shipping and delivery
- In the Shipping section, click on Manage rates
- Click on Add rate in the particular shipping zone
- Set the rate as "Set up your own rates," name it something like "Free Shipping," and add a condition on minimum weight or price if needed
- Click on Done, and that's it, now you should see this rate in your checkout
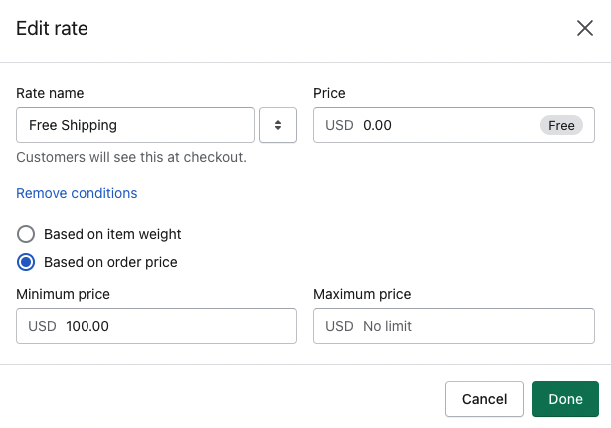
You can also limit the free shipping rate to particular geographies via the shipping zones or selected products.
The best practice is to put the free shipping information near the add-to-cart button, including the minimum requirements. Try to avoid the site-wide banners as visitors tend to overlook them.
Shopify is devoted to building a 100-year company and invests many resources to protect our planet. And so are many of the nowadays shoppers. Offering carbon-neutral shipping is an excellent way to reduce the impact on climate change and boost your conversion at the same time.
You can either use the official app from Shopify called Offset or one of the third-party ones, which are usually free. The benefit of the third-party ones is they display the information to the customer, and you can choose whether you will cover the extra costs or let it up to your customers.

On top of that, when a customer pays via Shop Pay or selects Shopify Shipping, the costs are covered by Shopify as a business.
Shopify offers an integrated way for your customers to leave you a tip during their checkout. Depending on your setup, it becomes a native part of the payment step, and customers can either choose the percentage tier or a custom amount. To enable tipping follow the steps below.
- Go to your store admin > Settings > Checkout
- Scroll down to the Tipping section, check the option Show tipping options at checkout
- Set your tipping tiers (one to three). We recommend deselecting Show tip options to all customers and setting the levels to 5% – 10% – 15%
- Confirm by clicking on Save

Keep in mind to monitor the impact on the overall checkout conversion rate as adding any fields (even voluntary ones) may impact it. If you won't see many customers leaving you tips, just go ahead and disable the form.
You can learn more from our guide on how to set up tipping in Shopify checkout.
You probably know that site speed is super important from the SEO point of view. But it's also a key factor from the conversion point of view. According to Portent research from 2019, the conversion drops by 4.42% with each additional second of load time.
To measure your Shopify checkout load time, you can't use the built-in online store speed report in themes. That measures only score on homepage, product, and collection pages. You need to use PageSpeed Insights from Google and enter the existing checkout URL (i.e., go to the first step of the checkout with any product and copy the URL).
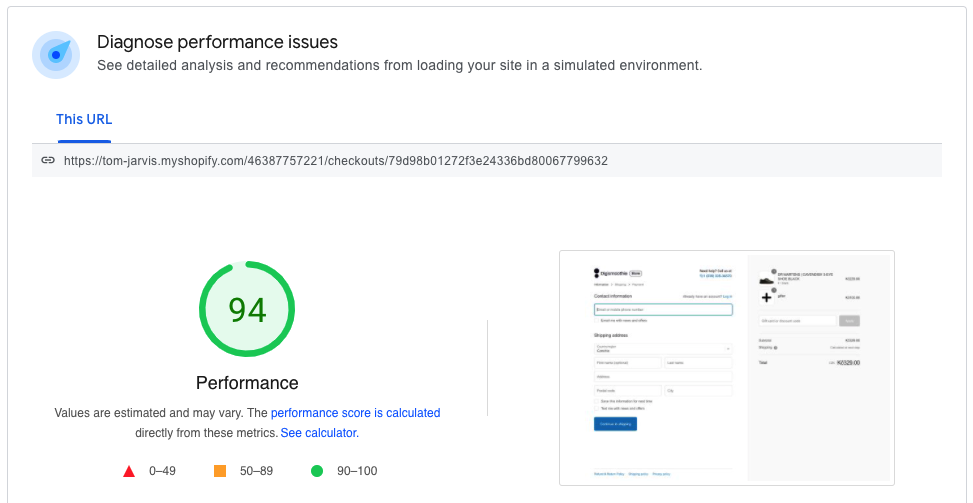
Unless you are on the Shopify Plus plan, you won't be able to fix or improve most of the findings. However, you should keep in mind to:
- Use compressed image for your logo or background in the checkout
- Be careful when using third-party apps or payment gateways that are loaded during the checkout, as they can significantly slow it down
In general, your checkout should load in up to 4 seconds. During my testing, Shopify checkout always loaded faster on desktop than mobile.
Almost 70% of customers leave the checkout before they finish the purchase. One of the most elegant ways to get them back are so-called checkout/cart abandonment emails.
If a customer leaves the email but doesn't complete the checkout, he will automatically get an email notification. These notifications are a native part of the Shopify platform, and it's super easy to enable them.
- Go to your store admin > Marketing > Automations
- Click on Create automation and select Abandoned checkout
- Customize the workflow settings and email
- Confirm by clicking on Save
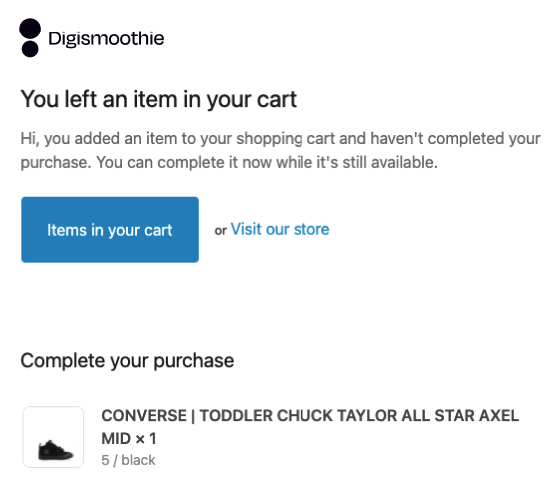
There are also plenty of options regarding who and when to send the email. We definitely recommend sending it to anyone who abandons checkout after 1 hour. Basically, the sooner the email will be sent, the higher chance to recover the customer is. You can expect to recover between 5 to 10% of the orders. Sending the email the next day really doesn't make much sense.
You can also customize the default email with the subject "Complete your Purchase." Overall, the email is OK, but it's missing a call to action. We recommend changing the default button label from "Items in your cart" to something more appealing like "Complete your purchase" or "Don't lose my items."
If you are looking for more advanced solution for cart abandonment recovery there are plenty of options on the app store. We recommend Payster where you can set up to 3 email reminders and define the send out time. On top of that, the app is able to recover both abandoned checkouts and unpaid orders (i.e., orders with delayed payment methods like wire transfer or cash on delivery).
Many merchants are unaware of this Shopify functionality, but you can prefill customers' information before getting to the checkout if you know them, of course.
The main advantage is that customers don't need to enter them, which simplifies the checkout process and removes some friction.
To add customers' information, use the following link structure, which leads directly to the checkout.
If you want to add the products as well, use the following one.
The complete list of variables is in the table below.
See our article "How to Create Custom Checkout Links With Prefilled Data on Shopify" for more details.
Do not force your customer to create an account before finishing the purchase. The forced account creation leads up to 37% of customers to abandon the purchase flow.
To enable the so-called guest checkout, follow these steps.
- Go to your store admin > Settings > Checkout
- In the section Customer accounts, select the option Accounts are optional
- Confirm by clicking on Save

However, customer accounts are beneficial for your returning customers, especially in combination with "Tip #11 – Preffil Customer Information." But the right way to ask your customers to create one is after they submit their first purchase. The approach is called post-purchase (or delayed) account creation, and there are two third-party apps to help you with that. And both are free to install.
- Smart Account Activate, which asks customers directly on the thank you page
- WOTIO Account Invites Plus, which sends an email to customers prompting them to create an account
Since 2017 Shopify has been using Google Places Autocomplete API to help customers fill their shipping and billing information. So when your customer starts typing an address, the smart suggestion will appear, and he can choose the correct address.
The suggestions always come from Google, not Shopify, even if the customer has an account. It works pretty well and significantly improves the overall checkout flow. To enable address autocompletion, follow these steps.
- Go to your store admin > Settings > Checkout
- Scroll down to the section Order processing, and check the option Enable address autocompletion
- Confirm by clicking on Save
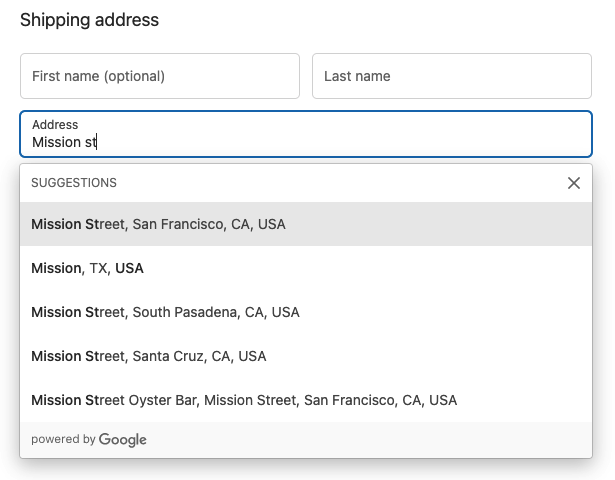
The disadvantage is that only some countries are supported. There is no "official list," and Google adds new countries regularly. A few examples of the supported countries are Australia, Austria, Belgium, Brazil, Canada, Denmark, France, Germany, Hong Kong SAR, India, Italy, Japan, Luxembourg, the Netherlands, New Zealand, Spain, Switzerland, and the United States.
This is quite an unknown yet very interesting feature of the Shopify checkout. Customers can finish the checkout using their mobile phone number instead of an email address when enabled.
While a mobile phone number is definitely more private information, it's also more regulated when it comes to marketing. According to the Telephone Consumer Protection Act (TCPA), customers must give businesses written consent before sending them any promotional or transactional messages.
And some customers just like the choice. Maybe they are not checking email regularly, and SMS is just easier for them to track the order status.
To enable checking out with the mobile phone number, follow these steps.
- Go to your store admin > Settings > Checkout
- In the Customer contact section, select "Customers can check out using either their phone number or email"
- Scroll down to the Marketing consent section and check "Show an option to subscribe at checkout"
- Confirm by clicking on Save
The default marketing consent says "Text me with news and offers." However, if you plan to use the SMS only for transactional messaging, you can change it to something more acceptable, like "Text me with order status updates." The text can be changed via the theme translations, as explained in tip #3 above.
Many customers shopping online are concerned about the shipping costs and return/refund rules. While the shipping is a native part of Shopify's checkout, the returns are down to each store and how it handles them.
According to Baymard Institue, many shoppers look for this information in the page footer. And that's why your checkout should include direct links to your Refund/Return Policy and other legal documents like Privacy Policy or Terms of Service. On top of that, your checkout will look more professional and trustworthy. How to add them?
- Go to your store admin > Settings > Policies
- Add your legal policies to relevant sections. If you don't have any, you can click on the "Replace with template" button to use the default templates from Shopify
- Click on Save, and the links will be automatically added to your checkout footer
We recommend displaying Refund Policy, Shipping Policy, and Privacy Policy during the checkout. If you have these, but they are not inserted via the Shopify Policies, they won't show in the checkout footer, and instead, the standard "All rights reserved" note will be displayed.
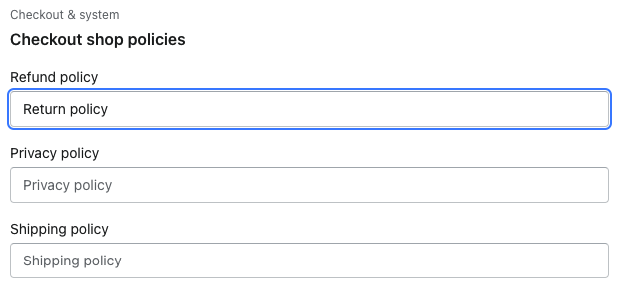
If you are not happy with the default naming, you can easily change the links by going to Settings > Themes > Actions > Edit languages > Checkout & system > Checkout shop policies.
The only disadvantage of displaying the policies in the checkout footer is that you are losing the option to display any custom text.
What's a Good Checkout Conversion Rate
According to the Baymard Institute, one of the most respected UX research organizations in e-commerce, the current average checkout drop-off rate is 69% (which represents a checkout conversion rate of 31%). So your goal should be getting better than the average. We regularly see solid Shopify stores achieving a conversion rate of 60%+ (i.e., drop-off rate lower than 40%).
Keep in mind optimizing your checkout is a never-ending process. There are always new things to try and test, new roll-outs, new features. The overall number also heavily depends on your mobile vs. desktop traffic split. In general, the desktop traffic converts four times better.
However, it's not about achieving a specific drop-off (or conversion) rate. It's about finding the balance between good conversion and tools to bring the average order value up.
Additional Resources
- How to Speed Up Checkout for Higher Conversions by Jessica Wynne Lockhart
- 13 Ecommerce Checkout Optimizations to Increase Conversions with Shopify Scripts by Shopify
- How to Calculate Checkout Abandonment Rate + Top 10 Metrics to Track by Bolt
- Cart & Checkout articles by Baymard Institute (worth reading!)
- How to Optimize Your Checkout Page by Benjamin Ligier