Shopify introduced metafields during Unite 2021 and released them to production at the beginning of 2022. Metafields are a great way to add additional parameters to products in your catalog and display them on a storefront.
Metaobjects are still relatively new, as they were introduced in February 2023. You can think of them as custom objects with multiple parameters/fields. Personally, I am always using the following rule:
- Is it a product parameter/value which is shared across multiple products? If yes, use metafield.
- Is it a content (block, section, image) that is displayed across the store on different template files? If yes, use metaobject to manage it.
This tutorial will show you how to use them on your Shopify store without coding or code editing. Please note you need to use any 2.0 theme.
What's the difference between metafields and metaobjects
Metafields store a simple piece of information like text, color, product, page, etc., which you can assign to any product, collection, page, blog post, etc., on your store. The disadvantage is that you need to enter the value for each separately. And if you want to update it, you must also update each individually.
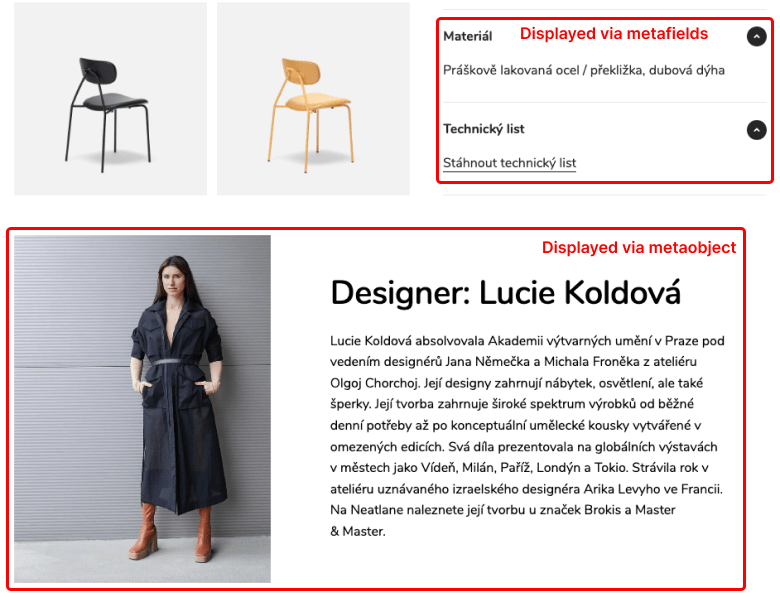
The typical use case is displaying additional information on your product detail pages like dimensions, material, delivery dates, or similar.
Metaobjects are above metafields, and each metaobject can contain several metafields. They are often used to display multiple parameters or repeated content in your store. The advantage of metaobjects is that you can edit them for all instances where they are being used simultaneously – from one place.
Using metaobjects makes perfect sense if you have a block or section on your store displayed on multiple pages.
How to add additional parameters to product detail pages using metafields
Let's say you have a store which is selling furniture. And each furniture product has different shared parameters (not variants). For example, chairs have unique 1. material, 2. designers, and 3. dimensions, which you want to display on your product detail page.
Step #1 – Creating metafield in your store admin
First, let's prepare all three metafields in the store admin:
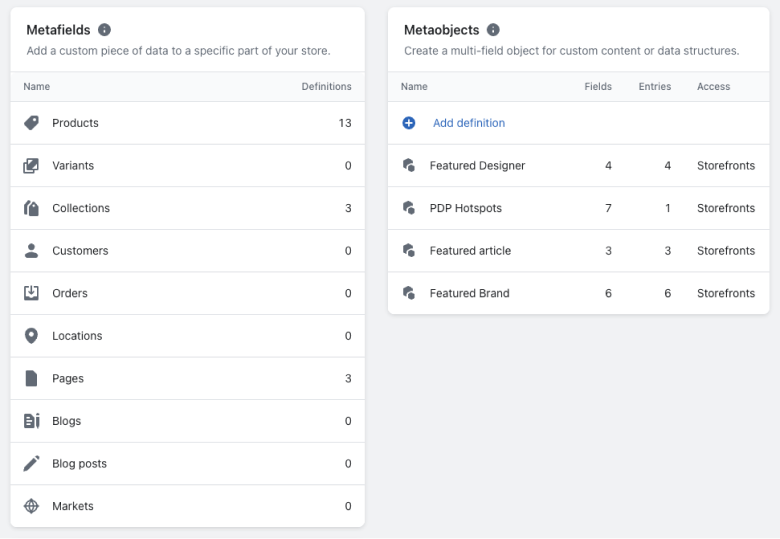
- Go to your store admin > Settings > Custom data
- In the Metafields section, select Products, and click on Add definition
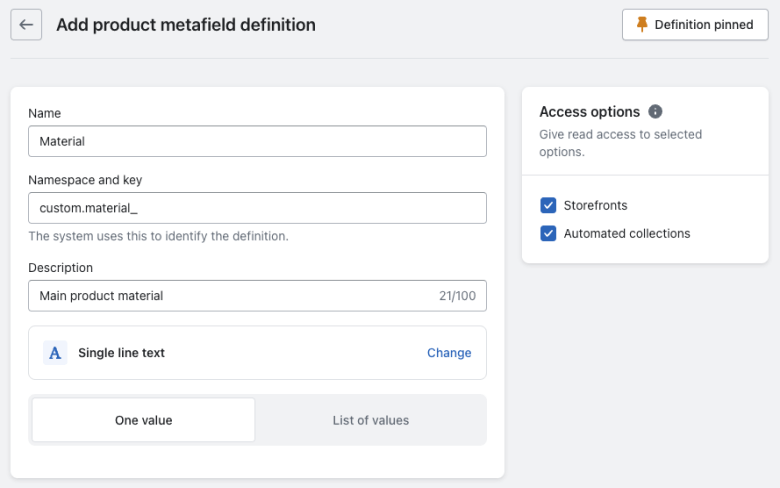
- Enter the metafield name (i.e., Material) and select type (i.e., Single line text)
Once you create all three metafields, it's time to add them to your chairs.
Step #2 – Adding metafields to products
You have metafields defined, so let's add them to your products:
- Go to your store admin > Products, and find a product for which you want to define those metafields
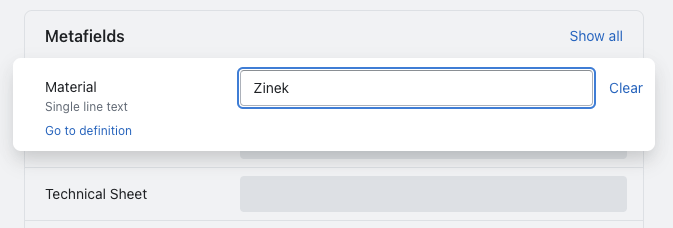
- On the product page in your admin, scroll all the way down to see available metafields
- Enter relevant data for this particular product, and click on Save
Step #3 – Displaying metafields on the product detail page
Now we have everything ready, so let's display the information from metafields on the PDP:
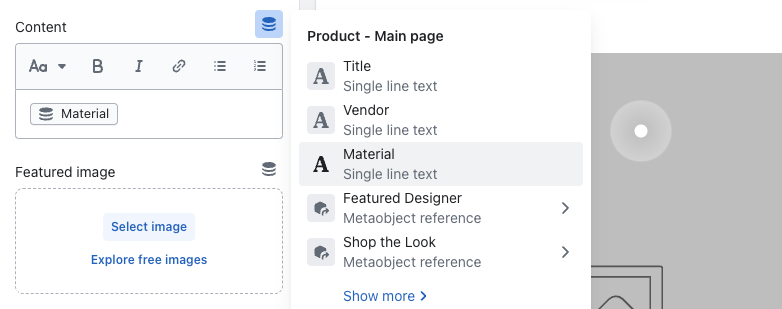
- Go to your store admin > Online Store > Themes > Customize
- In the top-middle template menu, select > Products > Default product
- Add a new block under the Product page, for example, Text
- Add metafields content by clicking on the database ("burger") icon
Now you can play with the metafields and display them in any way you like.
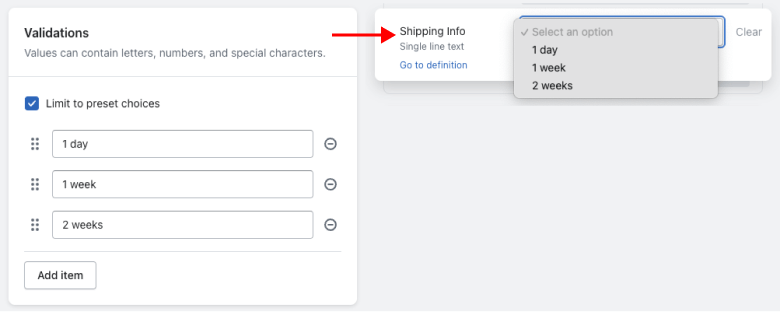
Our tip – Use preset choices to save time
Our tip is to use the "Limit to preset choices" in the metafield definition, as it will save you a lot of time. Instead of manually entering the value for each product, you can simply select it from the drop-down.
How to display dynamic content on product/collection pages using metaobjects
Metaobjects are more complex and allow you to add dynamic content to your store, which you can edit/update from a single place – almost like in a CMS. Imagine you would like to feature a different designer on each collection page, not just a name, but a full section including name, description, colors, images, etc.
In the old Shopify theme 1.0 days, you could do it by creating different templates. That also works, but it's very time-consuming, inconsistent, and inefficient. With metaobjects, you can create a single object and connect it to different products and pages.
Step #1 – Creating metaobject in your store admin
First, let's prepare the metaobject in the store admin:
- Go to your store admin > Settings > Custom data
- In the Metaobjects section, click on Add definition
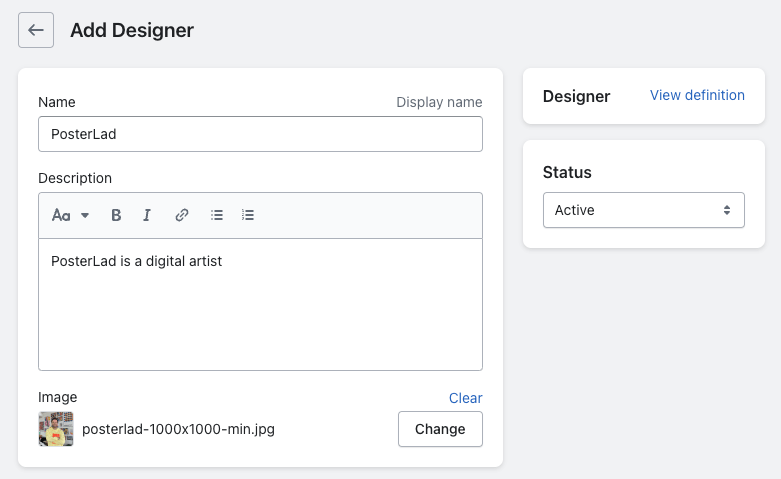
- Enter the metaobject name (i.e., Designer) and add (meta)fields
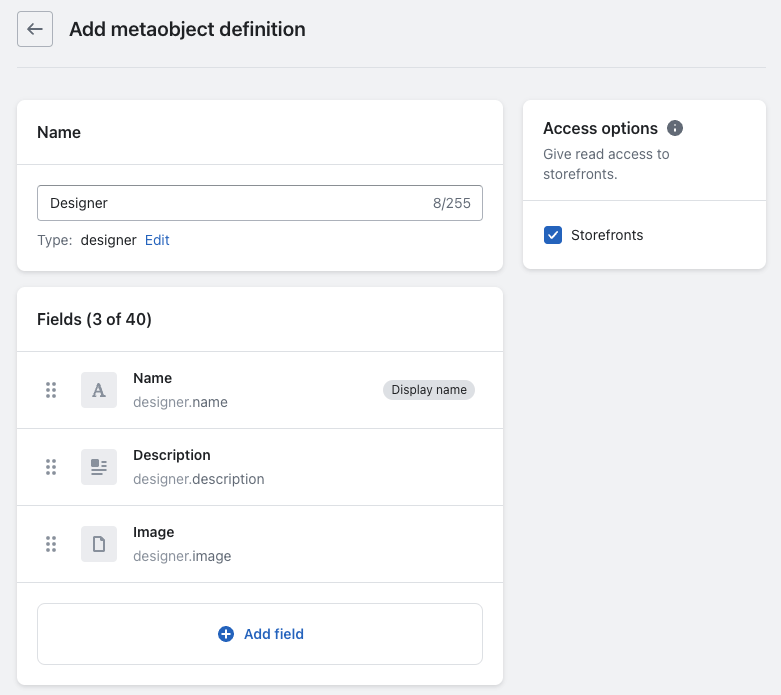
In our example, each designer has a Name (single line text), Description (rich text), Background and text color (color), and Main and Secondary image (file).
Step #2 – Add metaobject entries
Once the metaobject is created, you must fill it in with data:
- Go to your store admin > Settings > Custom data
- In the Metaobjects section, select the existing metaobject
- Click on More actions in the top-right corner and select Add new entry
- Fill in all the required inputs, save, and continue with another new entry (in case there are more)
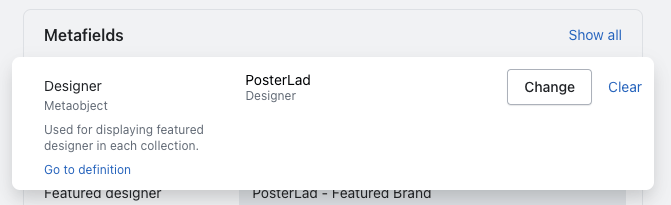
Step #3 – Prepare collection/product metafield
Now comes the tricky part. In order to connect a metaobject to any collection/product, you need to create a metafield first with the type metaobject. 🤯
- Go to your store admin > Settings > Custom data
- In the Metafields section, select Collections, and click on Add definition
- Enter the metafield name (i.e., Designer), select type (i.e., Metaobject), select Reference, which should be an existing metaobject, and save

If you have accomplished the reference connection, you should be able to assign a specific designer to each collection.
Step #4 – Add metaobject to collections
You have everything defined, so let's add metaobject to your collections:
- Go to your store admin > Products > Collections, and find a collection for which you want to define the metaobject
- On the collection page in your admin, scroll all the way down to see available metafields
- Click on the empty input next to your metafield, select one of the existing entries, and click on Save
Step #5 – Displaying metaobject on the collection page
Now we have everything ready, so let's display the information from metaobject on the collection pages:
- Go to your store admin > Online Store > Themes > Customize
- In the top-middle template menu, select > Collections > Default collection
- Add a new section as a placeholder and connect it to the metaobject by clicking the database ("burger") icon
- Connect relevant items in the section/block with the appropriate entries in your metaobject

Now you can play with the template and assign different entries to different collections. As a result, you will have different content on multiple collection pages while using a single template file.
Conclusion and final results
Understanding metafields and metaobjects in Shopify is quite complex and takes time. Start with simple items and iterate. Once you get a grip, you will be amazed how powerful they are and how much manual work they can save when managing your Shopify store.
On the final result above you can see a single product page template which can display different product information and designer for each product. Also, managing the content of the metaobject is now from a single place, so you don't need to update every single product manually.